Showing posts with label PC Tips and Tricks. Show all posts
Showing posts with label PC Tips and Tricks. Show all posts
Monday, September 14, 2015
5 Ways To Boost UP your internet Speed 100% working
Best and Efficient Ways Boost UP your internet Speed 100% working :

Slow internet browsing and Downloading speed , how irritating ? Are you suffering from low internet speed on PC while you trying to connect internet through 2G or 3G dongle( data modem). I am also using 2G network for blogging but i never feel my internet connection is very slow because i am using some tweaks to boost my internet speed. If you want to increase your internet speed , then follow my instructions:
STEPS TO BOOST YOUR INTERNET SPEED :
warning : before changing anything, make sure to note down your default settings input, it would help you if these tricks doesn't work to you.
1] CHANGING DNS SERVER :
What is DNS?
Domain Name Server or DNS is a server which simply converts the names of websites into their address, IP Address. Could you open Doole wesite by typing
173.194.36.34 in your browser? yeah! you can , but could you remember these long 10 digit number to access google? no, They are hard to remember. But could you
use www.google.com to access Google? yeah! its easy to remember.
DNS server do this for you, it converts www.google.com to 173.194.36.34
so you came to know that DNS plays a major role in internet speed. By switching to a fast and powerful DNS server, you can impreove your internet experience along with speed.
How to change Domain Name in Windows XP :
1.Open Control Panel
2.Switch to 'clasic view'. If you haven't yet.
3.Open 'netwik connections' by double clicking on it.
4.Now select your connection, if it is LAN then select Local Area Network or if it is Modem then select your modem.
5.Right click on your Network Connection, LAN or modem
6.select 'prperties'
7.properties dialog box will appear, now clock on 'Netwirking ' Tab
8.Double click on 'Internet Protocol(TCP/IP)
9.select 'Use the following DNS server addresses:'
10.Now in 'preferred DNS server' Paste the server addresses from given below lists'
11.In 'Alternate DNS sever' Paste Alternate DNS server assress below your preffered server'
12.Click OK, Again Click OK , If prompted again click OK
13.Restart your computer


How to change DNS server address in windows Vista, Windows 7 , Windows 8.1 and Windows 10 :
- Open Control Panel.
- On 'Network and Internet' click on 'View Network Status and Tasks'
- A windows will open, in that window on the right side panel in the middle options you can see 'connections' Option click on it
- Another window will popup , on that windows click on 'properties'
- Go to 'Networking' tab
- Double click on 'Internet Protocol Version 4 (TCP/IPv4)
- A window will come , on that window select ' 'Use the following DNS server addresses:'
- Now in 'preferred DNS server' Paste the server addresses from given below lists'
- 9. In 'Alternate DNS sever' Paste Alternate DNS server addssress below your proffered server'
- Click OK, Again Click OK , If prompted again click OK
- Restart your computer.
TOP 10 high Speed DNS Server addresses :
pate any following servers on proffered DNS server and Alternate DNS sever address.
Google:
Preferred DNS server - 8.8.8.8
Alternate DNS server - 8.8.4.4
Comodo DNS:
Preferred DNS server - 8.26.56.26
Alternate DNS server - 8.20.247.20
Norton DNS:
Preferred DNS server - 198.153.192.1
Alternate DNS server - 198.153.194.1
OpenDNS:
Preferred DNS server - 208.67.222.222
Alternate DNS server - 208.67.220.220
Level3:
Preferred DNS server - 209.244.0.3
Alternate DNS server - 209.244.0.4
ScrubIT3:
Preferred DNS server - 67.138.54.120
Alternate DNS server - 207.225.209.77
OpenNIC4:
Preferred DNS server - 69.164.208.50
Alternate DNS server - 216.87.84.211
Public-Root5:
Preferred DNS server - 199.5.157.131
Alternate DNS server - 208.71.35.137
DNS Advantage:
Preferred DNS server - 156.154.70.1
Alternate DNS server - 156.154.71.1
SmartViper:
Preferred DNS server - 208.76.50.50
Alternate DNS server - 208.76.51.51
2] Configuring Bandwidth :
Most of the Windows computer users don't know that the Microsoft has reserved 20% of our internet bandwidth for some of their own purposes like Windows update. By doing some changes on Local group policy of Windows computers, we can use the internet connection's maximum bandwidth.
Steps to perform to boost internet connection using microsoft by 20%:
- Click on Start Menu and type run and hit enter. ( Use Windows key + R )
- Type gpedit.msc on run command and hit enter.
- Now go to Local Group Policy --> Computer Configuration --> Administrative Templates --> Network.
- Now double click on QoS Packet Scheduler
- Then double click on Limit reservable bandwidth

6. Now a window will come , on that window select 'enable' and then make bandwidth to '0(Zero)'. as like below picture:

Finally click on Apply and OK.
3] Turn OFF Automatic Updates :
While you are connected to internet , Microsoft silently using your internet by searching for updates , these are all for only decreasing your internet speed, Updating your PC is required but not forever, so turn OFF Automatic Updates when you need to get full internet speed for only your work.
How to Turn OFF Automatic Updates :
In Windows XP:
1.Open 'Control Panel'
2.Make sure you have 'classic view' enable
3.Double click on 'system'
4.Navigate to 'Automatic Updates' tab
5.From 'Automatic Updates' tab, Uncheck 'keep my computer Up to Date' and hit OK to sabe the settings
In Windows 7, 8.1 and 10 :
It is very easy to find the program in windows 7 , 8.1 and 10 ,
1.Go to search and Type 'automatic upadates' , you can find it right?
2.Go to change settings and in drop menu select 'Never check for Updates'
3.Click on OK.
That's it

4] Using Command Prompt as a Administrator :
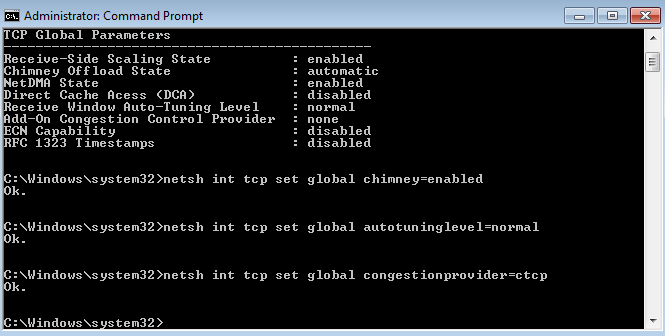
By using some commands on cmd you can boost your internet speed , to perform boost using command prompt , you HAVE TO run cmd as a Administrator .
netsh int tcp show global
netsh int tcp set global chimney=enabled
netsh int tcp set global autotuninglevel=normal
netsch int tcp set global congestionprovider=ctcp
While you are connected to internet , Microsoft silently using your internet by searching for updates , these are all for only decreasing your internet speed, Updating your PC is required but not forever, so turn OFF Automatic Updates when you need to get full internet speed for only your work.
How to Turn OFF Automatic Updates :
In Windows XP:
1.Open 'Control Panel'
2.Make sure you have 'classic view' enable
3.Double click on 'system'
4.Navigate to 'Automatic Updates' tab
5.From 'Automatic Updates' tab, Uncheck 'keep my computer Up to Date' and hit OK to sabe the settings
In Windows 7, 8.1 and 10 :
It is very easy to find the program in windows 7 , 8.1 and 10 ,
1.Go to search and Type 'automatic upadates' , you can find it right?
2.Go to change settings and in drop menu select 'Never check for Updates'
3.Click on OK.
That's it
4] Using Command Prompt as a Administrator :
By using some commands on cmd you can boost your internet speed , to perform boost using command prompt , you HAVE TO run cmd as a Administrator .
- Click on Start and Select all programs
- Click on accessories and select command prompt
- Now,run cmd as administrator
- Type following lines in command prompt and hit enter
netsh int tcp show global
netsh int tcp set global chimney=enabled
netsh int tcp set global autotuninglevel=normal
netsch int tcp set global congestionprovider=ctcp
5] Disable Some Application which are using internet on your PC:
Some applications use your internet connection in background for many things such as checking for new updates, updating software eyc,
These applications will use your internet connection every time when you are connected with internet. Even though it is not required , you can increase the speed of internet by disabling internet access of this kind of applications.
How can you know which programs are accessing my internet connection?
Just follow the given simple steps :
1. Download TCPEye software from HERE
2. Install TCPEye in your Computer
3. If you want to know which programs are using your internet connection, launch TCPEye program,
4. When you will run TCPEye , you can see different processes which are using internet connection.
5. If you want to block internet access for particular program , Right click on that process, and select end process.
6. There might be too many SVCHOST process, it is suggested to terminate all the SVChost processes and leave only one SVSHost process.
That's it : follow all the above tips to get full speed of internet and if you can't just try to follow 1,2 and 3 steps.
All the very best


How To check your Pendrive whether it is Original or fake
You can check Your Pen Drive or Memory Card is original or fake just using H2testw tool. H2testw scans Pen drive, hard disks (external and internal), memory cards or network volumes. Today you buy a Pen Drive or Memory Card and with cheap price? Sometime you see your Pen Drive or Memory Card size is 32 GB but don’t have space more than 1 GB. It is fake Pen Drive or Memory Card. I suggest please you buy Pen Drive or Memory Card only trusted brand and shop. Don’t buy Pen Drive or Memory Card on the roadside with very cheap price many times it’s fake. You can check Pen Drive or Memory Card is original or fake just using . H2testw can used for a scan Pen drive, memory cards or network volumes ,hard disks (external and internal).
H2testw is a very simple tool it’s absolutely free available, this tool is a portable not require installation. You are using for wanting to know the amount of errors that can be found on their device with verifying process. Download tool from below link and run program for starting verify Pen Drive or Memory Card.
H2testw is a very simple tool it’s absolutely free available, this tool is a portable not require installation. You are using for wanting to know the amount of errors that can be found on their device with verifying process. Download tool from below link and run program for starting verify Pen Drive or Memory Card.
How to Check Pen drive or Memory Card is Original or Fake?
First you download the tool from below link and extract zip file. Put Pen Drive or Memory Card and run this program. Please follow steps for checking Pen drive or Memory Card.
Step 1: Open h2testw folder and double click on “h2testw” icon.

Step 2: Choose “English” language and click on “Select target” button.

Step 3: Choose your Pen drive or Memory card drive

Step 4: Now you have to click on “Write + Verify” button and wait for a few minutes while it complete the process.


Step 5: Complete process without any error message, it means your pen drive or memory card is original. But if its Finds Error message, Means it is fake.


WEB PAGE TRANSLATOR Free
Translate Any Language Webpage from one language to another language :

Web Page translation is very effective and useful online application for translator a web page one language to another language. Think if you need to print a webpage, but it is in the another language so what will you do, you just abandon that webpage and will go for another one. but from now there is no need of it , just copy the address of the webpage link which appears on the address bar. Then go to the below link and paste the link into URL of webpage to translate. NOTE: before paste the URL delete the http:// from URL of webpage to translate box then paste the URL , and select languages from and to : you can leave the from language bar of detect language. then select translate. that's you can get your webpage with your needed language.
Online Webpage Translator

MAKE ANY YOUTUBE VIDEO OR PART OF A VIDEO INTO GIF IMAGE.
Make Any Youtube Video or Part of a Video into GIF image :

You can make any youtube video part into a gif image very easily. By creating a video into gif image you can set the image into your mobile desktop wallpaper you'll be unique from other mobile users. To turn youtube video into GIF image just add gif just after www. in the URL. For Example :
Once you type gif after www. URL press enter then you'll be redirected to a simple gif image making webpage which has very simple user interface to understand how to create gif image of a youtube video part. simply select location from where and to which part you want to convert video into GIF image and click on create gif . That's it. It'll convert your youtube video part into GIF image.
hover zoom extension for google chrome
install hover zoom extension for google chrome and mozilla firefox to enlarge images without clicks:

Every one struggling with enlarging images to see in bigger size on browser , mainly in facebook and google image searching right..but don't worry i understand your pain and i am giving you the best way to prevent this problem,,HOVER ZOOM is as extension for both moziilla firefox and google chrome for enlarging photos without clicking on it..you just need to move the cursor on the image thta's it your image will enlarge see and go for the another image...if you move the cursor pointer on a image it zooms the image to full size and you can see the image without open it.
add hover zoom extension for google chrome from below link
not working ..don't worry go through browser extensions and search for hover zoom by name you'll find it
Boring ..Try this Google Funny trick
Google funny trick :

first go to google.com
then type google gravity
press iam feeling lucky
wait for a moment and then see the gravity magic.....

first go to google.com
then type google gravity
press iam feeling lucky
wait for a moment and then see the gravity magic.....
Play and Watch STAR WARS MOVIE with video in cmd in windows xp
PLAY AND WATCH STAR WARS MOVIE ON CMD WITH OUT ANY VIDEO :

Make sure you have installed windows xp Operating system in your PC , because this trick will work on windows xp only. and you are going to watch total star wars movie with titles as shown in the above picture ( taken from experiment on my PC).but you don't get voice through it but you will get dialogue subtitles ...it has every character and you can watch whole movie...exciting right to begin movie you need to follow my footprints...
Click the start button then click Run .
Type telnet in run. You will find DOS black screen. in the black screen of Dos , type o and click enter and again typetowel.blinkenlights.nl and click enter . That's it, the text movie will begin, wait for few seconds and enjoy it..
Type telnet in run. You will find DOS black screen. in the black screen of Dos , type o and click enter and again typetowel.blinkenlights.nl and click enter . That's it, the text movie will begin, wait for few seconds and enjoy it..
Convert Video files from one format to another one with VLC media player
Convert Any video file from one format to another format using VLC inbuilt converter program :

what you is heard right, from now you don't need any other third party softwares for converting video files from one format to another one you have already installed that one..that is VLC now a days VLC media player is one of the common softwares installed in almost all every pc and Laptop. if you have already installed VLC you don't need any video converting softwares, for converting videos just follow my steps:
If you don't have VLC media player on your computer , better download and install it because it is one one of the most popular and best played which can play any type video including bluray. and also it has many features , you can watch youtube videos on it and many more but in this post i'll show you how to convert videos by using VLC
Step 1: Open VLC , Click on MEDIA > Convert/Save Or Press Ctrl+R . as shown in the above picture You will see A window.
Step 2: Now Click on ADD Button and Browse the File That you want to Convert.
Step 3: Click on Convert/Save Button. it will take you to the Final step and you Will see another Window .
Step 4: Now You Have to Select Destination File, to do So just Click on Browse and Select where you want to save the File after Conversion.
Step 4: Do the Settings According to your Need and Click on Start. Just wait while it Converts. Main Benefit Is that you Don't require Any other Software to Convert videos and it is Convenient To Use VLC to Convert Any Video.
just do it by yourself...
If you don't have VLC media player on your computer , better download and install it because it is one one of the most popular and best played which can play any type video including bluray. and also it has many features , you can watch youtube videos on it and many more but in this post i'll show you how to convert videos by using VLC
Step 1: Open VLC , Click on MEDIA > Convert/Save Or Press Ctrl+R . as shown in the above picture You will see A window.
Step 2: Now Click on ADD Button and Browse the File That you want to Convert.
Step 3: Click on Convert/Save Button. it will take you to the Final step and you Will see another Window .
Step 4: Now You Have to Select Destination File, to do So just Click on Browse and Select where you want to save the File after Conversion.
Step 4: Do the Settings According to your Need and Click on Start. Just wait while it Converts. Main Benefit Is that you Don't require Any other Software to Convert videos and it is Convenient To Use VLC to Convert Any Video.
just do it by yourself...
convert text to voice without using any third party software :

Hi viewers , to day i am going to share one of the best trick . You can convert any text msg into audio file with out using any software , it is amazing right. so why late just follow my steps to convert your text to audio. surprise your friends by doing my tips and tricks
step1. Open notepad then copy the below text and paste it in notepad.
Dim msg, sapi
msg=InputBox("Enter your text for conversion– ","By jvsivafriend")
Set sapi=CreateObject("sapi.spvoice")
sapi.Speak msg
Step 2: After Pasting the Above Code in notepad, Save the file with the name Text To Audio.vbs.
remember the name of the file should be with .vbs extension.
its nothing but a Vbscript File.
step1. Open notepad then copy the below text and paste it in notepad.
Dim msg, sapi
msg=InputBox("Enter your text for conversion– ","By jvsivafriend")
Set sapi=CreateObject("sapi.spvoice")
sapi.Speak msg
Step 2: After Pasting the Above Code in notepad, Save the file with the name Text To Audio.vbs.
remember the name of the file should be with .vbs extension.
its nothing but a Vbscript File.
( how to creat .vbs extension file : select file> save as > select --save as type >all files > name it as audio.vbs and click on save)
Step 3: Now double click on the saved file and you will see a box like the below pic
Step 4. Type your text which you want to hear, and then press OK. Thats it. All Done.
You can hear it load and clear.
Isn't it amazing ?
any problem with doing this , just comment below.you'll get solution for that problem as soon as possible
Step 3: Now double click on the saved file and you will see a box like the below pic
Step 4. Type your text which you want to hear, and then press OK. Thats it. All Done.
You can hear it load and clear.
Isn't it amazing ?
any problem with doing this , just comment below.you'll get solution for that problem as soon as possible
MATRIX NOTEPAD TRICK

Try and prank your friends by using this simple matrix notepad trick and be a member in matrix group.
Inspired by the movie Matrix, this falling code trick is extremely popular on social networking websites. Copy and paste the code given below in Notepad and save the file as "Matrix.bat".
How to create a .bat file using notepad : copy and paste the code in notepad and go to file > save as > (select destination where the file has to save) then select you can see 'file name' and 'Save as type' options first choose All files option from the Save as type drop down menu and then enter the file name same as ' matrix.bat ' (without quotes)
copy the below code :
color 02
:tricks
echo %random%%random%%random%%random%%random%%random%%random%%random%random%random%random%random%random%random%
goto tricks
Boost Mozilla firefox speed :

Boost your mozilla firefox browsing speed as well as load time by adjusting these settings
follow these steps:
type about:config in the address bar, then look for the following entries and make corresponding changes to increase the speed of firefox
network.http.max-connections-per-server = 32
network.http.max-persistent-connectins-per-proxy =16
network.http.max-connections = 64
network.http.max-persistent-connections-per-server= 10
network.http.peplining = true
network.http.peplining-maxrequests=200
network.http.request.max-start-delay = 0
network.http.proxy.pipelining = true
network.http.proxy.version = 1.0
Lastly right-click anywhere on the browser and select New-Integer. Name it nglayout.initialpaint.delay and set its value to 0. Thsi value is the amount of the time the browser waits before it acts on information it receives

Convert Any Webpage as a PDF file in simple method
Convert Any Webpage as a PDF file in simple method :

In this post i want to tell you a simple technique, By using that you can download any type of webpage into PDF format without using any software or add-in. it is very use full to download a important webpage to your PC, you can re open note the important notes on the webpage and you can save images , notes , stories and it has many uses to having a copy of webpage and in this post i am going to show you how to save any important webpage into PDF file in a very easy method.
How to save any webpage into PDF file :
- Open the Google Web Browser on your Windows PC or MAC
- Go to webpage which you want to convert and save that as a PDF file.
- Once the webpage opened, Press ctrl+p in windows PC and command+p in MAC to open the print dialogue on Google chrome
- Now change the destination to "save as PDF" and hit enter.
- that's it now you can save your favorite webpage in PDF structure file.

Open Blocked Websites
How to Open Blocked Websites :

There are many sites which are blocked by government because of breaking laws of their country. The user downloads many softwares to open these sites but end up being infected by malware, virus. Today i will share a trick with you guys which can help you easily open these banned sites without downloading anything. As you know that there are many online proxies but everyone need a proxy server which is faster and trusted. Here in this post I am revealing an online proxy and a tutorial to open banned sites with the help of these online proxies which is trusted and fast. Just follow my step to open banned sites.
How To Open Banned websites:
- open http://www.incloak.com/ in your browser
- After that enter the URL of the Banned site which you want to open
- it'll hide your IP and it opens the webpage
- enjoy browsing....
Repair Damaged,Corrupted and not detecting SD card or USB Flash Drive and solve windows was unable to format the drive problem
How to Repair Damaged and not detecting SD card or USB Flash Drive and Solve Windows Was Unable to Format the Drive :
If your PC does not detecting your SD card or USB flash drive and you are thinking of buy a new one, just wait and try this before spending bucks on the new one. When we inserted a corrupted flash drive into the USB port and try to access it, it shows an error like this:
You need to format the disk in drive before you can use it.
When you click on the Format Disk and start the format, it displays the following error:
Windows was unable to complete the format.
When you click on the Format Disk and start the format, it displays the following error:
Windows was unable to complete the format.

If you also have similar kind of problem with your SD card or External hard drive or USB flash drive, then keep reading. I am going to demonstrate a method to fix corrupted storage devices. The windows was unable to format the disk because it has no specific file system (e.g. NTFS, FAT) associated with it. This drive is called RAW drive and it can be repaired by formatting the disk.
NOTE: Before moving further, please note that this will remove all data from your SD card/ flash USB drive permanently. If you have some important data, you can try some hard drive data recovery tools before trying this. There are many hard drive recovery softwares available for free which can recover data from USB drives and external hard disks.
Before trying this method to repair your SD card, I would suggest you to try my previous method as it is easy and safe to perform. If that not work for you, you can come here and follow the below steps. Here is the link to my previous post
NOTE: Before moving further, please note that this will remove all data from your SD card/ flash USB drive permanently. If you have some important data, you can try some hard drive data recovery tools before trying this. There are many hard drive recovery softwares available for free which can recover data from USB drives and external hard disks.
Before trying this method to repair your SD card, I would suggest you to try my previous method as it is easy and safe to perform. If that not work for you, you can come here and follow the below steps. Here is the link to my previous post
Windows was Unable to Format the Drive -Solution
If you are sure you do not have any important files on your drive and want to repair it by formatting, follow these steps:
2. Then Open the Computer window and note down the drive letter. As you can see in my case it is D

3. Press Win Key + R to open Run box and type cmd. Hit enter and Command prompt window will launch. You can directly open command prompt by using the shortcut Win key + X and choosing Command prompt.

4. Type diskpart and press enter. An warning message will show up, just click Yes and a new command prompt window will open with heading DISKPART. Now, you need to type all the commands in this window.

5. Type list disk in order to list all the disk drives connected to your System. Detect your drive by its size as one will be of huge size(your Internal hard disk) and other will be your SD card/ USB flash drive. That’s why I asked you to remove all the other drives from your system.

6.Next, You need to choose your corrupted disk drive. Perform this step very Carefully because if you select the wrong disk number by mistake, it can remove all the data from your internal hard disk. Type select desk "your disk number ". As you can see, In my case it is Disk 2 of size 8 GB, So I will type select disk 2 and hit enter

7. Next type clean and a message will displayed that Diskpart succeeded in cleaning the disk.

8.Next you need to type the command - create partition primary and hit enter. A success message will be displayed.

9. After this type active and hit enter.

10.Now you need to execute the command select partition 1.
11.Finally, we are going to format the drive with file system FAT32 , so type format fs=fat32 and press enter.


When the format completes (100%), close the command prompt window and go to computer in order to check the drive. Verify your drive by compying some date in it. By this method, you can repair your corrupted SD Cards, USB flash drives and even your Extenal hard drives. Again , after performing above steps you will lose all your previous data, so, if you have some important data in your drive, try to recover it first using hard drive recovery software. Here is the summary of all the above performed operations in cmd in order.
-diskpart
-list disk
-select disk ‘your disk number’
-clean
-create partition primary
-active
-select partition 1
-format fs=fat32
SPEED UP PC OR LAPTOP USING THESE TIPS
The below top ten tips are recommended for any system. It doesn’t matter if you have 256mb RAM or 2 GB RAM. Check the below tips to remove the memory junk and speedup windows os.

1. Let your PC boot up completely before opening any applications.
2. Refresh the desktop after closing any application. This will remove any unused files from the RAM.
3. Do not set very large file size images as your wallpaper. Do not keep a wallpaper at all if your PC is low on RAM (less than 64 MB).
4. Do not clutter your Desktop with a lot of shortcuts. Each shortcut on the desktop uses up to 500 bytes of RAM
5. Empty the recycle bin regularly. The files are not really deleted from your hard drive until you empty the recycle bin.
6. Delete the temporary internet files regularly.
7. Defragment your hard drive once every two months. This will free up a lot of space on your hard drive and rearrange the files so that your applications run faster.
8. Always make two partitions in your hard drive. Install all large Softwares (like PSP, Photoshop, 3DS Max etc) in the second partition. Windows uses all the available empty space in C drive as virtual memory when your Computer RAM is full. Keep the C Drive as empty as possible.
9. When installing new Softwares disable the option of having a tray icon. The tray icons use up available RAM, and also slow down the booting of your PC. Also disable the option of starting the application automatically when the PC boots. You can disable these options later on also from the Tools or preferences menu in your application.
10. Protect your PC from dust. Dust causes the CPU cooling fan to jam and slow down thereby gradually heating your CPU and affecting the processing speed. Use compressed air to blow out any dust from the CPU. Never use vacuum.
RAM IS THE WORKING AREA (DESKTOP) OF THE CPU, KEEP IT AS EMPTY AND UNCLUTTERED AS POSSIBLE!
1. Let your PC boot up completely before opening any applications.
2. Refresh the desktop after closing any application. This will remove any unused files from the RAM.
3. Do not set very large file size images as your wallpaper. Do not keep a wallpaper at all if your PC is low on RAM (less than 64 MB).
4. Do not clutter your Desktop with a lot of shortcuts. Each shortcut on the desktop uses up to 500 bytes of RAM
5. Empty the recycle bin regularly. The files are not really deleted from your hard drive until you empty the recycle bin.
6. Delete the temporary internet files regularly.
7. Defragment your hard drive once every two months. This will free up a lot of space on your hard drive and rearrange the files so that your applications run faster.
8. Always make two partitions in your hard drive. Install all large Softwares (like PSP, Photoshop, 3DS Max etc) in the second partition. Windows uses all the available empty space in C drive as virtual memory when your Computer RAM is full. Keep the C Drive as empty as possible.
9. When installing new Softwares disable the option of having a tray icon. The tray icons use up available RAM, and also slow down the booting of your PC. Also disable the option of starting the application automatically when the PC boots. You can disable these options later on also from the Tools or preferences menu in your application.
10. Protect your PC from dust. Dust causes the CPU cooling fan to jam and slow down thereby gradually heating your CPU and affecting the processing speed. Use compressed air to blow out any dust from the CPU. Never use vacuum.
RAM IS THE WORKING AREA (DESKTOP) OF THE CPU, KEEP IT AS EMPTY AND UNCLUTTERED AS POSSIBLE!
join Video Files using Command Promp
join Video Files using Command Prompt –

Yes, that’s right. In this post I am going to show you a simple tip to join video of various formats like Mpeg, dat, mpg.. If you have questions like
1. How to join various video files into one?
2. Join two video files?
3. How to Join videos taken from mobile phone?
Then, the best method to follow is shown below. You can join your video files using just the windows Command Prompt. No need of any video joining software’s.
Step 1: For example if you have 3 videos in your hardrive root drive: video1.mpg, video2.mpg and video3.mpg just rename them to a, b, and c (just the letter withoug the file extension).
Example:
ren video1.mpg a
ren video2.mpg b
ren video3.mpg c
Step 2: Open Command Prompt. Start–>Run–>type “cmd”.
Step 3: Type the location of the drive like d: or C:
Step 4: Type: Copy /b a + b + c videoname.mpg
and click enter
Step 5: Now wait till you see: 1 files<s> copied.
Yes, that’s right. In this post I am going to show you a simple tip to join video of various formats like Mpeg, dat, mpg.. If you have questions like
1. How to join various video files into one?
2. Join two video files?
3. How to Join videos taken from mobile phone?
Then, the best method to follow is shown below. You can join your video files using just the windows Command Prompt. No need of any video joining software’s.
Step 1: For example if you have 3 videos in your hardrive root drive: video1.mpg, video2.mpg and video3.mpg just rename them to a, b, and c (just the letter withoug the file extension).
Example:
ren video1.mpg a
ren video2.mpg b
ren video3.mpg c
Step 2: Open Command Prompt. Start–>Run–>type “cmd”.
Step 3: Type the location of the drive like d: or C:
Step 4: Type: Copy /b a + b + c videoname.mpg
and click enter
Step 5: Now wait till you see: 1 files<s> copied.
Subscribe to:
Posts (Atom)